Layout Management
Qt 布局系统提供一种简单强大的方式, 在widget中自动排列子widgets, 确保高效利用可用空间.
简介
Qt 包含一组布局管理类, 描述widgets在应用程序UI的布局方式. widgets的可用空间变化时, 布局管理类自动定位和调整widgets的大小,确保它们排列一致, 且整个UI界面仍然可用.
所有 QWidget 子类都可以使用布局管理它们的子对象. QWidget::setLayout() 函数给widget添加布局. 采用这种方式设置布局, 它负责下列任务:
- 计算子widgets的位置.
- 计算windows的默认大小.
- 计算windows最小尺寸.
- 处理大小变化.
- 内容改变时自动更新:
- 字体大小, 文本或子widgets的其他内容.
- 控制子widgets的显隐.
- 移除子widgets.
Qt的布局类
Qt的布局类为手写C++代码设计, 允许使用像素测量, 便于理解使用. Qt Designer 创建的widgets也使用布局管理器. Qt Designer 设计widgets时非常有用, 它避免用户界面开发中经常涉及的编译, 链接和运行周期.
Represents an anchor between two items in a QGraphicsAnchorLayout | |
Layout where one can anchor widgets together in Graphics View | |
Lines up child widgets horizontally or vertically | |
Lines up widgets horizontally | |
Lines up widgets vertically | |
Manages forms of input widgets and their associated labels | |
Lays out widgets in a grid | |
The base class of geometry managers | |
Abstract item that a QLayout manipulates | |
Blank space in a layout | |
Layout item that represents a widget | |
Layout attribute describing horizontal and vertical resizing policy | |
Stack of widgets where only one widget is visible at a time | |
Container to organize groups of button widgets | |
Group box frame with a title | |
Stack of widgets where only one widget is visible at a time |
Horizontal, Vertical, Grid, and Form Layouts
为widgets添加布局的最简单方式是使用内置布局管理器: QHBoxLayout, QVBoxLayout, QGridLayout, QFormLayout. 这些类继承自 QLayout, QLayout继承自 QObject (不是 QWidget). 它们管理一组widgets的几何形状. 如果要创建复杂布局, 你可以将它们相互嵌套.
- A QHBoxLayout lays out widgets in a horizontal row, from left to right (or right to left for right-to-left languages).

- A QVBoxLayout lays out widgets in a vertical column, from top to bottom.
- A QGridLayout lays out widgets in a two-dimensional grid. Widgets can occupy multiple cells.
- A QFormLayout lays out widgets in a 2-column descriptive label- field style.
Laying Out Widgets in Code
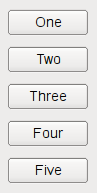
下列代码创建一个 QHBoxLayout 管理5个 QPushButtons 的几何形状, 如上面第一个屏幕截图所示:
      QWidget *window = new QWidget;
      QPushButton *button1 = new QPushButton("One");
      QPushButton *button2 = new QPushButton("Two");
      QPushButton *button3 = new QPushButton("Three");
      QPushButton *button4 = new QPushButton("Four");
      QPushButton *button5 = new QPushButton("Five");

      QHBoxLayout *layout = new QHBoxLayout;
      layout->addWidget(button1);
      layout->addWidget(button2);
      layout->addWidget(button3);
      layout->addWidget(button4);
      layout->addWidget(button5);

      window->setLayout(layout);
      window->show();
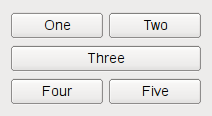
QVBoxLayout 的代码相同, 除了布局中创建的行. QGridLayout 有点不同, 因为我们需要设置子widget的行和列:
      QWidget *window = new QWidget;
      QPushButton *button1 = new QPushButton("One");
      QPushButton *button2 = new QPushButton("Two");
      QPushButton *button3 = new QPushButton("Three");
      QPushButton *button4 = new QPushButton("Four");
      QPushButton *button5 = new QPushButton("Five");

      QGridLayout *layout = new QGridLayout;
      layout->addWidget(button1, 0, 0);
      layout->addWidget(button2, 0, 1);
      layout->addWidget(button3, 1, 0, 1, 2);
      layout->addWidget(button4, 2, 0);
      layout->addWidget(button5, 2, 1);

      window->setLayout(layout);
      window->show();
第三个 QPushButton 占2列. 这个可以通过 QGridLayout::addWidget()的第五个参数设置为2实现.
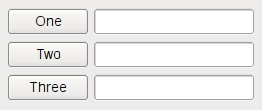
QFormLayout 在一行上添加两个 widgets , 通常用于一个 QLabel 和一个 QLineEdit 创建表单. 添加 QLabel 和 QLineEdit 时, 可以把 QLineEdit 设置为 QLabel的伙伴. 下列代码使用 QFormLayout 放置3组 QPushButtons 和相应的 QLineEdit.
      QWidget *window = new QWidget;
      QPushButton *button1 = new QPushButton("One");
      QLineEdit *lineEdit1 = new QLineEdit();
      QPushButton *button2 = new QPushButton("Two");
      QLineEdit *lineEdit2 = new QLineEdit();
      QPushButton *button3 = new QPushButton("Three");
      QLineEdit *lineEdit3 = new QLineEdit();

      QFormLayout *layout = new QFormLayout;
      layout->addRow(button1, lineEdit1);
      layout->addRow(button2, lineEdit2);
      layout->addRow(button3, lineEdit3);

      window->setLayout(layout);
      window->show();
使用布局提示
使用布局时, 你构造子widgets不需要传递父widget. 布局自动给给 widgets (调用 QWidget::setParent()) 设置父widget, 确保子widgets的父是布局widget.
注意: 布局中的widgets 是布局widget的子对象, 不是 布局的子对象. widgets 只能将widget作为父对象, 而不是布局.
你可以调用 addLayout() 在布局上嵌套布局; 然后内部布局变成插入布局的子对象.
向布局添加 Widgets
向布局添加 widgets 时, 布局过程如下所示:
- 所有widgets 初始空间由它们的 QWidget::sizePolicy() 和 QWidget::sizeHint()决定.
- 如果 widgets 设置拉伸因子, 且值大于0, 那么它们按照拉伸因子的比例分配空间 (解释如下).
- 如果 widgets 的拉伸因子设为0, 那么只有其他widgets不需要空间时, 它们才会获得空间. 其中, 空间优先分配给具有 Expanding 大小策略的widget.
- 分配空间小于 widgets 的最小大小 (或者未设置最小大小, 则依照最小大小提示)时, 将分配最小大小所需空间. (Widgets 不必须有最小大小或最小提示, 此类情况, 拉伸因子是它们的决定因素.)
- 分配空间大于widgets 的最大大小时, 将分配最大大小空间. (Widgets 不必须有最大大小, 此类情况, 拉伸因子是它们的决定因素.)
Stretch Factors
Widgets 通常不需要设置拉伸因子. 它们在同一布局时, 根据它们的 QWidget::sizePolicy() 或最小大小提示 (取最大值) 分配空间. 拉伸因子用于改变widgets之间空间比例.
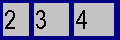
如果我们使用QHBoxLayout布局三个 widgets, 并且未设置拉伸因子, 那么我们得到如下布局:

如果我们为每个widget设置拉伸因子, 它们将按比例排列 (但不会小于它们最小大小提示), 如.
布局中自定义 Widgets
使用自定义 widget 时, 你应该设置布局属性. 如果widget使用Qt的布局, 这个已经考虑. 如果 widget 没有任何子 widgets, 或手动布局, 你可以使用下列机制定义widget的行为:
- 重新实现 QWidget::sizeHint() 返回widget的首选大小.
- 重新实现 QWidget::minimumSizeHint() 返回widget的最小大小.
- 调用 QWidget::setSizePolicy() 设置 widget 的空间策略.
当大小提示, 最小大小提示, 大小策略改变时, 调用 QWidget::updateGeometry(). 这会重新计算布局. 多次调用 QWidget::updateGeometry() 只会重新计算一次布局.
如果widget的首选高度取决于它的实际宽度 (如., 自动分词的 label ), 在widget的size policy中设置 height-for-width 标志, 并重新实现 QWidget::heightForWidth().
即使你实现 QWidget::heightForWidth(), 你也应该提供一个合理的 sizeHint().
有关这些函数的更多指导, 参见 Qt Quarterly 文章 Trading Height for Width.
布局问题
在一个标签widget中使用富文本会给父widget的布局带来一些问题. 当标签使用以字为单位换行时, Qt的布局管理处理富文本的方式可能引发一些问题.
某些情况下, widget的布局设置为QLayout::FreeResize模式, 子widget 将无法调整内容以适应小窗口, 还可能在窗口太小时无法使用. 你可以通过子类化widget, 重新实现 sizeHint() 和 minimumSizeHint() 函数解决这类问题.
某些情况下, 仅当widget添加布局后, 你才能给widget 设置 QDockWidget 或 QScrollArea (调用 QDockWidget::setWidget() 或 QScrollArea::setWidget()). 否则, widget将不可见.
手动布局
如果你正在做一个独特的布局, 你也可以如上所述自定义widget. 重新实现 QWidget::resizeEvent() 以计算widget的大小分布, 并对每个子widget调用 setGeometry().
当布局需要重新计算时, widget会接收到一个 QEvent::LayoutRequest 事件. 重新实现 QWidget::event() 处理 QEvent::LayoutRequest 事件.
如何编写自定义布局管理器
Border Layout 和 Flow Layout 示例演示如何子类化 QLayout编写自定义布局管理器.
这里详细展示一个示例. CardLayout 的灵感来自同名的 Java 布局管理器. 它将每个子项(widgets 或嵌套布局) 放置在彼此的顶部, 子项间的偏移量由 QLayout::spacing()决定.
要编写自定义布局类, 你必须定义以下内容:
- 定义一个存储布局中item的数据结构. 每个item是一个 QLayoutItem. 在本例中我们使用 QList.
- addItem(), 如何将item加入布局.
- setGeometry(), 如何展示布局.
- sizeHint(), 布局的首选大小.
- itemAt(), 如何通过布局迭代.
- takeAt(), 如何从布局移除item.
多数情况下, 你还需要实现 minimumSize().
头文件 (card.h)
  #ifndef CARD_H
  #define CARD_H

  #include <QtWidgets>
  #include <QList>

  class CardLayout : public QLayout
  {
  public:
      CardLayout(QWidget *parent, int dist): QLayout(parent, 0, dist) {}
      CardLayout(QLayout *parent, int dist): QLayout(parent, dist) {}
      CardLayout(int dist): QLayout(dist) {}
      ~CardLayout();

      void addItem(QLayoutItem *item);
      QSize sizeHint() const;
      QSize minimumSize() const;
      int count() const;
      QLayoutItem *itemAt(int) const;
      QLayoutItem *takeAt(int);
      void setGeometry(const QRect &rect);

  private:
      QList<QLayoutItem*> list;
  };
  #endif
实现文件 (card.cpp)
//#include "card.h"
我们首选定义 count() , 获取链表中item数量.
  int CardLayout::count() const
  {
      // QList::size() returns the number of QLayoutItems in the list
      return list.size();
  }
然后我们定义2个布局迭代函数: itemAt() 和 takeAt(). 布局系统内部使用这两个函数删除widget. 应用程序也可以使用它们删除widget.
itemAt() 返回item的索引. takeAt() 删除给定索引的item, 并将其返回. 本例中使用链表作为布局索引. 我们也可以使用复杂的数据结构, 但是可能花费一些时间定义item的线性顺序.
  QLayoutItem *CardLayout::itemAt(int idx) const
  {
      // QList::value() performs index checking, and returns 0 if we are
      // outside the valid range
      return list.value(idx);
  }

  QLayoutItem *CardLayout::takeAt(int idx)
  {
      // QList::take does not do index checking
      return idx >= 0 && idx < list.size() ? list.takeAt(idx) : 0;
  }
addItem() 实现items的默认布局策略. 这个函数必须重新实现. 它被QLayout::add()调用, 由以布局类为父对象的 QLayout 构造函数使用. 如果你的布局需要额外的参数, 你必须提供额外的访问函数. 例如行列布局 QGridLayout::addItem(), QGridLayout::addWidget(), QGridLayout::addLayout().
  void CardLayout::addItem(QLayoutItem *item)
  {
      list.append(item);
  }
布局承担添加items的功能. 由于 QLayoutItem 不是继承自 QObject, 我们必须手动删除items. 在析构函数中, 我们调用 takeAt()从链表移除每个item, 然后删除它.
  CardLayout::~CardLayout()
  {
       QLayoutItem *item;
       while ((item = takeAt(0)))
           delete item;
  }
setGeometry() 函数执行布局. 它的参数rect不包含 margin(). 使用 spacing() 作为items间距.
  void CardLayout::setGeometry(const QRect &r)
  {
      QLayout::setGeometry(r);

      if (list.size() == 0)
          return;

      int w = r.width() - (list.count() - 1) * spacing();
      int h = r.height() - (list.count() - 1) * spacing();
      int i = 0;
      while (i < list.size()) {
          QLayoutItem *o = list.at(i);
          QRect geom(r.x() + i * spacing(), r.y() + i * spacing(), w, h);
          o->setGeometry(geom);
          ++i;
      }
  }
sizeHint() 和 minimumSize() 在实现上非常相似. 这两个函数返回的大小都包含 spacing(), 但不包含 margin().
  QSize CardLayout::sizeHint() const
  {
      QSize s(0,0);
      int n = list.count();
      if (n > 0)
          s = QSize(100,70); //start with a nice default size
      int i = 0;
      while (i < n) {
          QLayoutItem *o = list.at(i);
          s = s.expandedTo(o->sizeHint());
          ++i;
      }
      return s + n*QSize(spacing(), spacing());
  }

  QSize CardLayout::minimumSize() const
  {
      QSize s(0,0);
      int n = list.count();
      int i = 0;
      while (i < n) {
          QLayoutItem *o = list.at(i);
          s = s.expandedTo(o->minimumSize());
          ++i;
      }
      return s + n*QSize(spacing(), spacing());
  }
进一步说明
- 自定义布局不处理高度.
- 我们忽略 QLayoutItem::isEmpty(); 这意味着布局将隐藏widgets视为可见widgets.
- 对于复杂布局, 缓存计算值可以提供计算速度. 此种情况下, 实现 QLayoutItem::invalidate()标记丢弃缓存数据, 并重新计算.
- 调用 QLayoutItem::sizeHint()等函数可能是耗时的. 因此, 在同一函数中使用这类函数的返回值时, 你应该创建局部变量保存它.
- 你不应该在同一函数中多次调用 QLayoutItem::setGeometry(). 如果item有多个子widget, 这个函数非常耗时, 因为布局管理器必须每次计算整个布局. 相反, 你应该计算完几何形状, 然后设置它. (这种方式不仅适用于布局, 你也应该在自定义resizeEvent()时采用同样的做法.)
布局示例
Qt的许多 Widgets examples 已经使用布局, 其中, 下列示例展示各种布局.