Getting Started with Qt Remote Objects
Introduction
Qt远程对象 (QtRO) 模块提供一种在进程和设备间共享Qt API的简单方法. 为了实现这一点, 我们必须在进程和设备间有一个数据通道. 为了建立这个数据通道, 你需要一个 QRemoteObjectNode. 在QtRO中, 一个节点是一个通信端点. 在远程对象网络中, 无论是设备还是进程, 每个参与者都需要自己的节点. QtRO是一个对等网络, 连接的节点是网络中的链路.
节点本身并不提供太多的用途. 但是, 当你将 QObject 类添加到共享节点, 它们就有价值. 然后, 任何对等节点都可以向共享对象的主机节点请求共享对象的副本或实例 . 与普通的QObject实例对象不同, QtRO在共享对象的所有副本中自动同步共享对象的更改. 除少数例外, 这些副本与原始对象具有相同的Qt API, 且使用方式与原始对象完全相同. 在QtRO中, 原始对象称为 Source. 它是一个完全实现的C++类, 具有提供所需功能所必需的业务逻辑. 对象的副本称为 Replica. 你不需要为副本编写任何C++代码, 而是从节点请求一个实例. 虽然你确实需要一些代码使用副本, 例如将信号连接到槽函数, 但是你不需要实现内部行为-这些已经在Source实现.
因为Source可能在不同的进程或设备上, 所有QtRO需要考虑进程间通信(IPC)的情况. 具体来说, 如果没有进程或设备, 可能发生哪些情况? 这就是 Replica API新增的功能. 一旦Replica从QtRO网络接收到source状态, 就会发出 initialized() 信号. 如果连接丢失, 属性 isReplicaValid 和信号 stateChanged() 都可以获取状态.
共享对象通过QtRO使用节点链路(管道)进行所有通信. 如果你想共享 QObject, 你必须创建一个带有URL的 主机节点. 你也可以使用 Registry 创建连接, 但是共享 sources 的节点仍需要主机节点. 每个共享对象都需要一个名称 (a QString), 用于QtRO网络识别.
详见 Overview, 或参考下列实现远程对象的方式.
开始使用
在Source端, 我们需要:
- 创建 Source 象, 其他节点从Source对象创建副本, 这个对象可以使用 repc(QtRO编译器), 也可以不使用repc编译.
- (可选) 创建 Registry. 否则, 使用直连方式.
- 创建主机节点, 以便Source对象可以被共享.
- 调用节点的 enableRemoting() 函数共享Source对象.
在Replica端, 我们需要:
以下示例说明 repc编译静态对象和动态Source对象. 此外, 它们也展示直接连接节点或使用 Registry 连接节点.
Example 1: Direct Connection Using a Static Source
In this example, the source object is a simple binary switch that will toggle its state based on a timer. When the state changes, a signal is emitted by the source which QtRO propagates to all replicas. As the replica will have the same properties, signals and slots as were exposed from the source object, any slots connected to the replica's signal will be called when the replica receives the signal. The client process then echoes back the received switch state to the source by emitting its own signal which is connected to a slot on the replica.
- Create a source object
To create this Source object, we first create the definition file,
simpleswitch.rep. This file describes the properties and methods for the object and is input to the repc utility which is part of Qt Remote Objects. Only the interfaces that need to be exposed to Replica objects are defined in this file.simpleswitch.repclass SimpleSwitch { PROP(bool currState=false); SLOT(server_slot(bool clientState)); };
Above,
currStateholds the current state of the switch, andserver_slot()allows us to interact with the Source - it will be connected to theechoSwitchState(bool newstate)signal.
For repc to process this file, add the following line to the
.profile:REPC_SOURCE = simpleswitch.rep
The
REPC_SOURCEvariable is only relevant for the Qt Remote Object module, so you need to add it to your project as well:QT += remoteobjects
repc creates the header
rep_SimpleSwitch_source.hin your specified build directory. Refer to the Source section for more details about this file.Repc creates three helper classes for use with QtRO. For this example, we will use the most basic:
SimpleSwitchSimpleSource. It is an abstract class, defined inrep_SimpleSwitch_source.h. We derive from it to define our SimpleSwitch implementation class as shown below:simpleswitch.h#ifndef SIMPLESWITCH_H #define SIMPLESWITCH_H #include "rep_SimpleSwitch_source.h" class SimpleSwitch : public SimpleSwitchSimpleSource { Q_OBJECT public: SimpleSwitch(QObject *parent = nullptr); ~SimpleSwitch(); virtual void server_slot(bool clientState); public Q_SLOTS: void timeout_slot(); private: QTimer *stateChangeTimer; }; #endif
Above,
stateChangeTimeris a QTimer that is used to toggle the state of our SimpleSwitch,timeout_slot()is connected to the timeout() signal ofstateChangeTimer,server_slot(), which is called on the source (automatically via QtRO) whenever any replica calls their version of the slot, outputs the received value, andcurrStateChanged(bool)signal, defined in repc-generatedrep_SimpleSwitch_source.h, is emitted whenever currState toggles. In this example, we ignore the signal on the source side, and handle it later on the replica side.
The definition of our
SwitchStateclass is shown below:simpleswitch.cpp#include "simpleswitch.h" // constructor SimpleSwitch::SimpleSwitch(QObject *parent) : SimpleSwitchSimpleSource(parent) { stateChangeTimer = new QTimer(this); // Initialize timer QObject::connect(stateChangeTimer, SIGNAL(timeout()), this, SLOT(timeout_slot())); // connect timeout() signal from stateChangeTimer to timeout_slot() of simpleSwitch stateChangeTimer->start(2000); // Start timer and set timout to 2 seconds qDebug() << "Source Node Started"; } //destructor SimpleSwitch::~SimpleSwitch() { stateChangeTimer->stop(); } void SimpleSwitch::server_slot(bool clientState) { qDebug() << "Replica state is " << clientState; // print switch state echoed back by client } void SimpleSwitch::timeout_slot() { // slot called on timer timeout if (currState()) // check if current state is true, currState() is defined in repc generated rep_SimpleSwitch_source.h setCurrState(false); // set state to false else setCurrState(true); // set state to true qDebug() << "Source State is "<<currState(); }
- Create a registry
Because this example involves using a direct connection between nodes, step 2 for Registry creation is omitted.
- Create a host node
The host node is created as shown below:
QRemoteObjectNode srcNode = QRemoteObjectNode::createHostNode();
- Host source object and remoting
The following statements instantiate the Source object and pass it to the host to enable "remoting", that is, making the object visible to the QtRO network:
  SimpleSwitch srcSwitch; // create simple switch
  srcNode.enableRemoting(&srcSwitch); // enable remoting
The contents of
main.cppfile that implements the above steps are shown below:main.cpp#include <QCoreApplication> #include "simpleswitch.h" int main(int argc, char *argv[]) { QCoreApplication a(argc, argv); SimpleSwitch srcSwitch; // create simple switch QRemoteObjectNode srcNode = QRemoteObjectNode::createHostNode(); // create host node without Regsitry //The static node creation routines take one or two URLs as input parameters, but they have default values to help people getting started. //It is recommended use your own URLs in any production environment to avoid name conflicts. srcNode.enableRemoting(&srcSwitch); // enable remoting/sharing return a.exec(); }
Compile and run this (source side) project. The output (without any replicas created) should look as shown below with the switch state toggling between
trueandfalseevery two seconds.
Next are the steps for creating the replica side of the network, which in this example gets the state of switch from the Source and echoes it back.
Replica Code
- Use repc to add a replica to your project
The same API definition file as was used on the source side,
SimpleSwitch.rep, is used for creating a Replica header file using the repc utility. Include the following line in your client side.profile, specifying a.repfile input:REPC_REPLICA = simpleswitch.rep
The repc tool generates a
rep_SimpleSwitch_replica.hfile in the build directory. Refer to Replica section for more details about this file. - Create a node to connect with the source's host node
The following code instantiates the second node on the network and connects it with the source host node:
  QRemoteObjectNode repNode; // create remote object node
  repNode.connect(); // connect with remote host node
- Call node's acquire() to create a pointer to a replica
First, a replica is instantiated:
  QSharedPointer<SimpleSwitchReplica> ptr;
  ptr.reset(repNode.acquire<SimpleSwitchReplica>()); // acquire replica of source from host node
Note that acquire() returns a pointer to the replica. However, it does not manage the pointer lifetime. This example uses the recommended process of wrapping the returned pointer in a QSharedPointer or QScopedPointer to ensure the pointer is properly deleted.
main.cppimplements above steps and instantiates our object:main.cpp#include <QCoreApplication> #include "client.h" int main(int argc, char *argv[]) { QCoreApplication a(argc, argv); QSharedPointer<SimpleSwitchReplica> ptr; // shared pointer to hold source replica QRemoteObjectNode repNode; // create remote object node repNode.connect(); // connect with remote host node ptr.reset(repNode.acquire<SimpleSwitchReplica>()); // acquire replica of source from host node Client rswitch(ptr); // create client switch object and pass reference of replica to it return a.exec(); }
Complete declaration and definition of the
Clientclass:client.h#ifndef _CLIENT_H #define _CLIENT_H #include <QObject> #include <QSharedPointer> #include "rep_SimpleSwitch_replica.h" class Client : public QObject { Q_OBJECT public: Client(QSharedPointer<SimpleSwitchReplica> ptr); ~Client(); void initConnections();// Function to connect signals and slots of source and client Q_SIGNALS: void echoSwitchState(bool switchState);// this signal is connected with server_slot(..) on the source object and echoes back switch state received from source public Q_SLOTS: void recSwitchState_slot(); // slot to receive source state private: bool clientSwitchState; // holds received server switch state QSharedPointer<SimpleSwitchReplica> reptr;// holds reference to replica }; #endif
client.cpp#include "client.h" // constructor Client::Client(QSharedPointer<SimpleSwitchReplica> ptr) : QObject(nullptr),reptr(ptr) { initConnections(); //We can connect to SimpleSwitchReplica Signals/Slots //directly because our Replica was generated by repc. } //destructor Client::~Client() { } void Client::initConnections() { // initialize connections between signals and slots // connect source replica signal currStateChanged() with client's recSwitchState() slot to receive source's current state QObject::connect(reptr.data(), SIGNAL(currStateChanged()), this, SLOT(recSwitchState_slot())); // connect client's echoSwitchState(..) signal with replica's server_slot(..) to echo back received state QObject::connect(this, SIGNAL(echoSwitchState(bool)),reptr.data(), SLOT(server_slot(bool))); } void Client::recSwitchState_slot() { qDebug() << "Received source state "<<reptr.data()->currState(); clientSwitchState = reptr.data()->currState(); Q_EMIT echoSwitchState(clientSwitchState); // Emit signal to echo received state back to server }
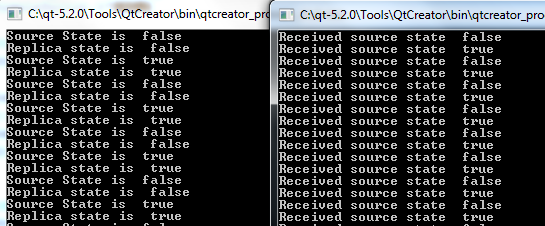
Compiling and executing this example together with the source-side example generates the following output:
Example 2: Direct Connection with a Dynamic Replica
A dynamic replica is initially created as a "bare" QObject - that is, it has no properties, signals or slots. QtRO returns the API for the object during initialization (after the connection to the source is made), thus the API is added to the object at runtime. Dynamic replicas are good when a replica is intended to be used in QML.
There are no changes to source side as a dynamic Replica only impacts how the requestor node acquires the replica. The source-side code shown in Example 1 will be used.
- Add replica generation to project.
Because the replica is dynamically acquired, no
.repfile is required unlike in Example 1. - Create the remote node and connect it with the source host node.
The code for this step is unchanged from Example 1.
  QRemoteObjectNode repNode; // create remote object node
  repNode.connect(); // connect with remote host node
- Acquire a replica of the remote source object.
In
main.cpp, we use a QSharedPointer to hold a replica of the remote object, and then instantiate a replica requestor object:#include <QCoreApplication> #include "dynamicclient.h" int main(int argc, char *argv[]) { QCoreApplication a(argc, argv); QSharedPointer<QRemoteObjectDynamicReplica> ptr; // shared pointer to hold replica QRemoteObjectNode repNode; // create remote object node repNode.connect(); // connect with remote host node ptr.reset(repNode.acquire("SimpleSwitch")); // acquire replica of source from host node dynamicclient rswitch(ptr); // create client switch object and pass replica reference to it return a.exec(); }
Below is the complete declaration and definition of the requestor class (DynamicClient in this example):
dynamicclient.h
  #ifndef _DYNAMICCLIENT_H
  #define _DYNAMICCLIENT_H

  #include <QObject>
  #include <QSharedPointer>

  #include <QRemoteObjectNode>
  #include <qremoteobjectdynamicreplica.h>

  class DynamicClient : public QObject
  {
      Q_OBJECT
  public:
      DynamicClient(QSharedPointer<QRemoteObjectDynamicReplica> ptr);
      ~DynamicClient();

  Q_SIGNALS:
      void echoSwitchState(bool switchState);// this signal is connected with server_slot(..) slot of source object and echoes back switch state received from source

  public Q_SLOTS:
      void recSwitchState_slot(); // Slot to receive source state
      void initConnection_slot(); //Slot to connect signals/slot on replica initialization

  private:
      bool clientSwitchState; // holds received server switch state
      QSharedPointer<QRemoteObjectDynamicReplica> reptr;// holds reference to replica
   };

  #endif
dynamicclient.cpp
  #include "dynamicclient.h"

  // constructor
  DynamicClient::DynamicClient(QSharedPointer<QRemoteObjectDynamicReplica> ptr) :
      QObject(nullptr), reptr(ptr)
  {

      //connect signal for replica valid changed with signal slot initialization
      QObject::connect(reptr.data(), SIGNAL(initialized()), this, SLOT(initConnection_slot()));
  }

  //destructor
  DynamicClient::~DynamicClient()
  {
  }

  // Function to initialize connections between slots and signals
  void DynamicClient::initConnection_slot()
  {

      // connect source replica signal currStateChanged() with client's recSwitchState() slot to receive source's current state
     QObject::connect(reptr.data(), SIGNAL(currStateChanged()), this, SLOT(recSwitchState_slot()));
     // connect client's echoSwitchState(..) signal with replica's server_slot(..) to echo back received state
     QObject::connect(this, SIGNAL(echoSwitchState(bool)),reptr.data(), SLOT(server_slot(bool)));
  }

  void DynamicClient::recSwitchState_slot()
  {
     clientSwitchState = reptr->property("currState").toBool(); // use replica property to get currState from source
     qDebug() << "Received source state " << clientSwitchState;
     Q_EMIT echoSwitchState(clientSwitchState); // Emit signal to echo received state back to server
  }
When executed together with the source-side example, the output is identical to Example 1.
Example 3: Remote Nodes using a Registry
This example will illustrate the use of Registry for building the node topology. For only two nodes, the benefits of using the Registry are minimal. With a registry, instead of using a QUrl to create a direct connection between two nodes, you use a different QUrl to point both the host and replica nodes to the registry. As the network grows, using a registry means that all nodes only need to connect to the registry via a single QUrl. With direct connections, nodes would have to maintain a list of QUrls for each node they link to.
Source Code
The simpleswitch.h and simpleswitch.cpp sources from Example can be used without modification. The difference is in the way a host node is created and connected to the Registry:
main.cpp
  #include <QCoreApplication>
  #include "simpleswitch.h"

  int main(int argc, char *argv[])
  {
      QCoreApplication a(argc, argv);

      SimpleSwitch srcSwitch; // create SimpleSwitch

      QRemoteObjectNode regNode = QRemoteObjectNode::createRegistryHostNode(); // create node that hosts registy
      QRemoteObjectNode srcNode = QRemoteObjectNode::createHostNodeConnectedToRegistry(); // create node that will host source and connect to registry
      //Note, you can add srcSwitch directly to regNode if desired.
      //We use two Nodes here, as the regNode could easily be in a third process.

      srcNode.enableRemoting(&srcSwitch); // enable remoting of source object

      return a.exec();
  }
Replica Code
Requestor object used for this example is the dynamic replica client discussed in Example 2.
The only modification is in main.cpp: a Registry node is created to acquire a Replica:
QRemoteObjectNode repNode = QRemoteObjectNode::createNodeConnectedToRegistry();
When executed together with the source-side example, the output is identical to Example 1.