First Steps with QML
创建QML文档
QML文档定义具有可读性强, 结构化布局的对象层次结构. 每个QML由两部分组成: 导入部分和对象声明部分. QtQuick 导入提供用户界面最常见的类型和功能.
导入并使用QtQuick模块
QML文档想要使用 Qt Quick 模块, 必须导入它. 导入语法如下:
import QtQuick 2.3
现在, QML文档可以使用 Qt Quick 提供的类型和函数!
定义对象层次
QML文档中的对象声明定义在视觉场景中显示的内容. Qt Quick 为所有用户界面提供基本的构建单元, 例如显示图像和文本, 处理用户输入对象.
如下, 一个简单对象可能声明一个带有颜色的矩形, 并居中文本:
  Rectangle {
      width: 200
      height: 100
      color: "red"

      Text {
          anchors.centerIn: parent
          text: "Hello, World!"
      }
  }
上例定义了一个 Rectangle 根对象的对象层次结构, 这个对象具有 Text 子对象. Text 的父对象自动设置为 Rectangle. 类似地, QML将 Text 对象添加到Rectangle对象的子属性中.
Putting it All Together
上述示例中使用的 Rectangle 和 Text 类型均由 QtQuick 导入提供. 将导入和对象声明放在一起, 我们得到了一个完整的QML文档:
  import QtQuick 2.3

  Rectangle {
      width: 200
      height: 100
      color: "red"

      Text {
          anchors.centerIn: parent
          text: "Hello, World!"
      }
  }
如果我们将文件保存为 "HelloWorld.qml", 我们可以加载并显示它.
Creating and Running QML Projects
想要显示QML文档定义的图形场景, 我们可以使用 Qt Creator加载它. 对于"HelloWorld.qml"这样简单的UI文件, 加载的方式是: 打开Qt Creator, File > New File or Project > Applications > Qt Quick UI.
按下绿色的 Run 按钮运行应用程序. 你可以在一个红色的矩形中心看到文字 Hello, World!.
有关如何创建和运行项目, 参考下列文档:
Creating QML Applications with Controls
Qt Quick提供基本的图元, Qt Quick Controls 为应用程序提供现成的QML类型.
Inserting the ApplicationWindow 是创建应用程序的良好起点. 应用程序UI的基本布局如下:
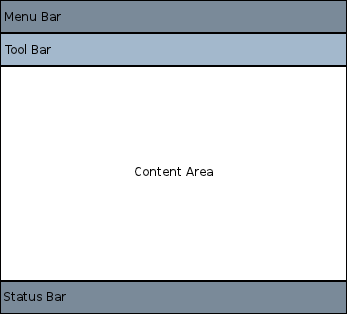
每个区域可以添加和连接不同的控件组合成应用程序. 例如, 下列代码片段简单的应用程序, 演示如何使用有效空间:
  //import related modules
  import QtQuick 2.3
  import QtQuick.Controls 1.2
  import QtQuick.Window 2.2

  //window containing the application
  ApplicationWindow {

      //title of the application
      title: qsTr("Hello World")
      width: 640
      height: 480

      //menu containing two menu items
      menuBar: MenuBar {
          Menu {
              title: qsTr("File")
              MenuItem {
                  text: qsTr("&Open")
                  onTriggered: console.log("Open action triggered");
              }
              MenuItem {
                  text: qsTr("Exit")
                  onTriggered: Qt.quit();
              }
          }
      }

      //Content Area

      //a button in the middle of the content area
      Button {
          text: qsTr("Hello World")
          anchors.horizontalCenter: parent.horizontalCenter
          anchors.verticalCenter: parent.verticalCenter
      }
  }
这个应用程序有两个菜单, 中间区域放一个按钮. 点击 Exit 菜单关闭应用程序.
还有不同的导航方法和控件, 如按钮和滑块. 下面示例可从Qt Creator获得, 并演示不同的控件和布局.
将这些片段复制并粘贴到这个简单的Hello World应用程序上, 了解QML如何工作.
处理用户输入
使用QML定义用户界面的一大优点是: QML允许用户界面设计器使用简单的JavaScript表达式定义应用程序如何对事件做出反应. 在QML中,我们将这些事件称为 信号 , 这些信号由 信号处理程序处理.
考虑下列示例:
  Rectangle {
      width: 200
      height: 100
      color: "red"

      Text {
          anchors.centerIn: parent
          text: "Hello, World!"
      }

      MouseArea {
          anchors.fill: parent
          onClicked: parent.color = "blue"
      }
  }
这个示例保存为 "ClickableHelloWorld.qml", 使用qmlscene运行. 用户单击窗口中的任何位置时, 矩形从红色变为蓝色. 注意:MouseArea 在触摸时也会发Tapped信号, 因此, 上述代码片段也适用移动设备.
键盘用户输入可以用一个简单的表达式进行类似的处理:
  Rectangle {
      width: 200
      height: 100
      color: "red"

      Text {
          anchors.centerIn: parent
          text: "Hello, World!"
      }

      focus: true
      Keys.onPressed: {
          if (event.key == Qt.Key_Return) {
              color = "blue";
              event.accepted = true;
          }
      }
  }
获取焦点后, 任意时刻按下"return"键, 颜色变为蓝色.
Property Bindings
在QML中, 对象和属性构成图形界面的基础. QML语言允许属性以各种方式相互绑定, 从而实现高度动态的用户界面.
在下面的示例中, 每个 Rectangle 的几何形状绑定到父 Rectangle的几何形状上. 由于属性绑定, 如果父 Rectangle 的几何形状改变, 每个子 Rectangle 的几何形状自动更新.
  Rectangle {
      width: 400
      height: 200

      Rectangle {
          width: parent.width / 2
          height: parent.height
      }

      Rectangle {
          width: parent.width / 2
          height: parent.height
          x: parent.width / 2
      }
  }
Animations
属性也可以通过动画动态更新. QtQuick 包含多种动画类型, 按照动画效果改变属性值. 下列示例中, 在 Text 区域动态显示动画的属性值:
  Rectangle {
      color: "lightgray"
      width: 200
      height: 200

      property int animatedValue: 0
      SequentialAnimation on animatedValue {
          loops: Animation.Infinite
          PropertyAnimation { to: 150; duration: 1000 }
          PropertyAnimation { to: 0; duration: 1000 }
      }

      Text {
          anchors.centerIn: parent
          text: parent.animatedValue
      }
  }
属性值在0~150之间变动.
自定义可复用的QML类型
QML中最重要的概念是类型复用. 一个应用程序可能有多个相似的视觉类型(如多个按钮), QML允许将这些类型定义为可重复使用的自定义类型, 以便最大限度的减少代码重复, 提高可读性.
例如, 假设开发人员在Button.qml文件中, 定义一个MessageLabel类型 Button:
  // Button.qml
  import QtQuick 2.3

  Rectangle {
      width: 100; height: 100
      color: "red"

      MouseArea {
          anchors.fill: parent
          onClicked: console.log("Button clicked!")
      }
  }
如下所示, 新定义的类型可以多次使用:
// application.qml import QtQuick 2.3 Column { Button { width: 50; height: 50 } Button { x: 50; width: 100; height: 50; color: "blue" } Button { width: 50; height: 50; radius: 8 } } |
|
在应用程序中, 模块化用户界面类型, 组装, 复用.
有关如何开发自定义可重用组件, 详见 QML Object Attributes.
Where to Go from Here
现在, 你已经了解QML作用, 下一章将开始QML之旅.